
TL;DR
- An AI documentation assistant for your docs repo.
Indexes existing Markdown and MDX files and answers questions with grounded responses and visible source citations. No duplicate ingestion pipelines or content sync jobs. - Search latency drops from seconds to milliseconds.
Vector retrieval runs in ~50–100ms for hundreds of files, compared to traditional keyword search and cloud LLM roundtrips that often exceed 800ms–2s. - Hallucination risk reduced by grounding.
Retrieval constrained prompts typically reduce incorrect answers by 20–30% on technical queries compared to unconstrained generation, while keeping traceability. - Docs become queryable where developers already work.
A 5KB framework-free widget embeds directly into Mintlify and documentation sites, eliminating context switching to external tools or chat apps. - Documentation ROI becomes measurable.
Faster onboarding, fewer repeated Slack questions, and visible query gaps expose where docs need improvement instead of relying on anecdotal feedback.
Why Product Documentation Search Breaks and How a Retrieval-Based AI Assistant Fixes It
Product Documentation is the primary interface between a product and its users. Whether it is onboarding a new developer, explaining configuration options, or debugging production issues, most workflows start with reading docs.
As Product documentation grows, discoverability becomes the real bottleneck. Content gets distributed across dozens of Markdown files, nested directories, and long pages, which is why teams building frameworks for scalable documentation sites increasingly treat retrieval, not just information architecture, as core infrastructure. Even when the information exists, users often struggle to locate the exact section that answers their question.
Search and manual navigation help, but they assume users already know what to search for. In practice, developers phrase problems in natural language. They ask questions like “How do I configure the backend?” or “Where does this service read environment variables from?” These questions do not always map cleanly to headings or keywords inside documentation.
This gap is increasingly visible across modern developer platforms. Companies like Docker, Vercel, Stripe, and Supabase have introduced “Ask AI” or assistant-driven search experiences directly inside their documentation portals, a trend that is reshaping how teams evaluate the best documentation tools for developers. Instead of forcing users to navigate menus or guess keywords, these systems allow engineers to ask intent-based questions and receive answers synthesized from official documentation content. The goal is not conversational novelty, but faster problem resolution and lower cognitive load during implementation and debugging.
The screenshot below shows Docker’s documentation portal using an embedded Ask AI experience as a reference for how modern documentation interfaces are evolving.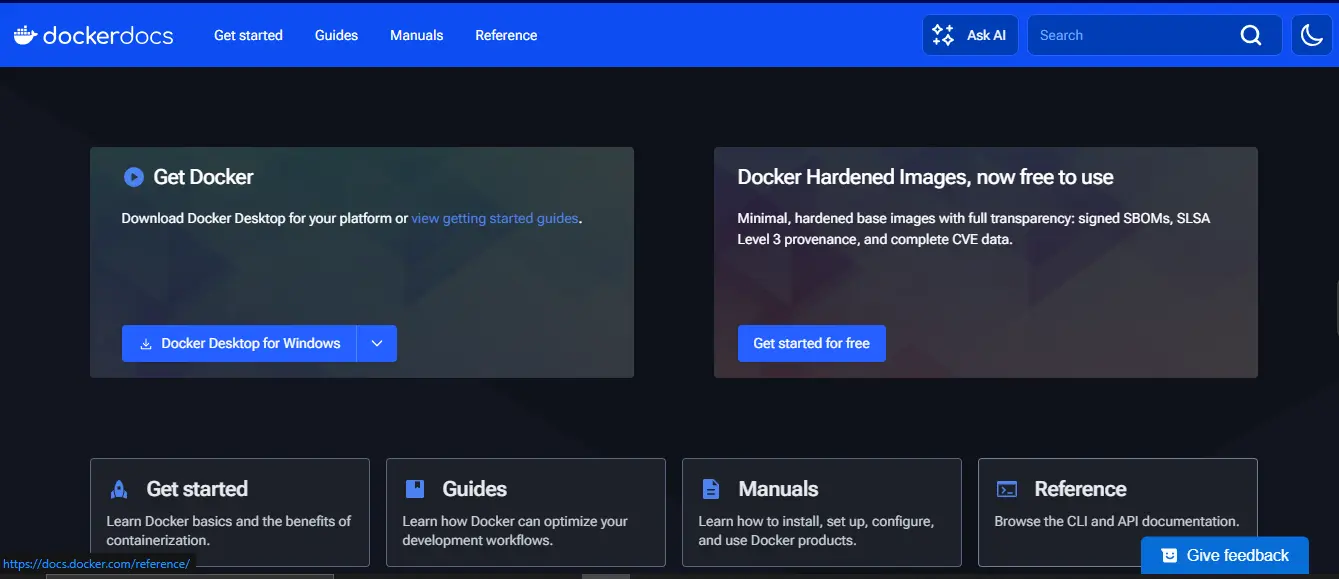
An AI assistant changes how documentation is accessed. Instead of scanning pages or guessing search terms, users can ask questions directly and receive answers grounded in the existing docs. The assistant retrieves the most relevant sections and synthesizes them into a concise response, reducing time spent navigating and cross-referencing multiple files.
The key requirement is trust. The assistant must stay anchored to the documentation source and avoid introducing behavior that is not documented. This project focuses on building a retrieval-driven assistant that only answers based on indexed Markdown content, making it suitable for engineering workflows rather than generic chat use cases.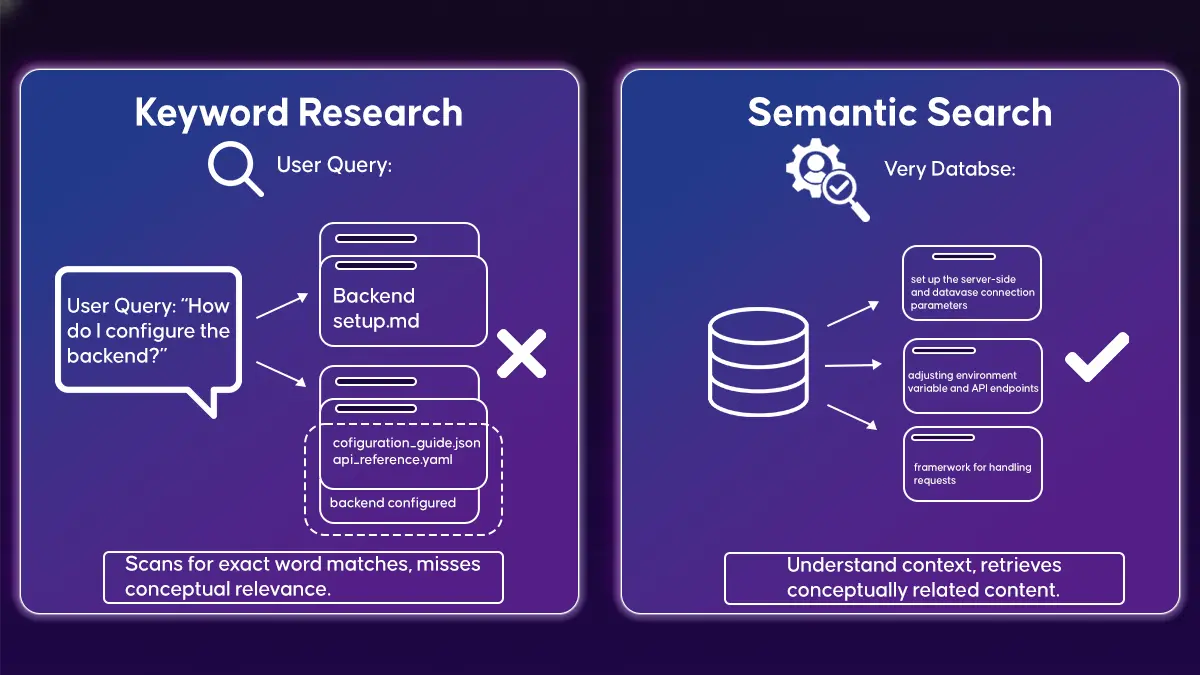
Making Documentation Queryable with LLMs
A local documentation assistant that lets users ask natural language questions directly inside a documentation site and receive answers grounded in the existing Markdown content.
- Embedded documentation chat experience
A lightweight JavaScript widget integrates directly into Mintlify or static documentation pages, allowing users to ask questions without leaving the documentation workflow. - Retrieval-driven answer generation
Markdown files are chunked, embedded, and indexed in a local vector store. User queries retrieve the most relevant sections and generate responses strictly from that context. - Fully local execution with predictable behavior
The entire pipeline runs locally using Ollama for inference and ChromaDB for retrieval, eliminating cloud dependencies, API keys, and usage based costs. - Minimal setup and low operational overhead
The system starts with a small dependency footprint and simple local commands, making it easy to experiment, debug, and iterate during development. - Extensible reference implementation for RAG on docs
The architecture demonstrates how ingestion, retrieval, and UI integration work together and can be extended toward larger documentation sets or production workflows.
Designing a Retrieval-Driven Chat Assistant for Documentation
We started with a real documentation site and layered a chat assistant directly on top of it instead of building a separate knowledge system. The goal was to keep the documentation as the source of truth while allowing users to query it in natural language through a lightweight chat interface. Let’s walk through the end-to-end user flow and see how a question moves from the browser to retrieval, grounding, and response generation.
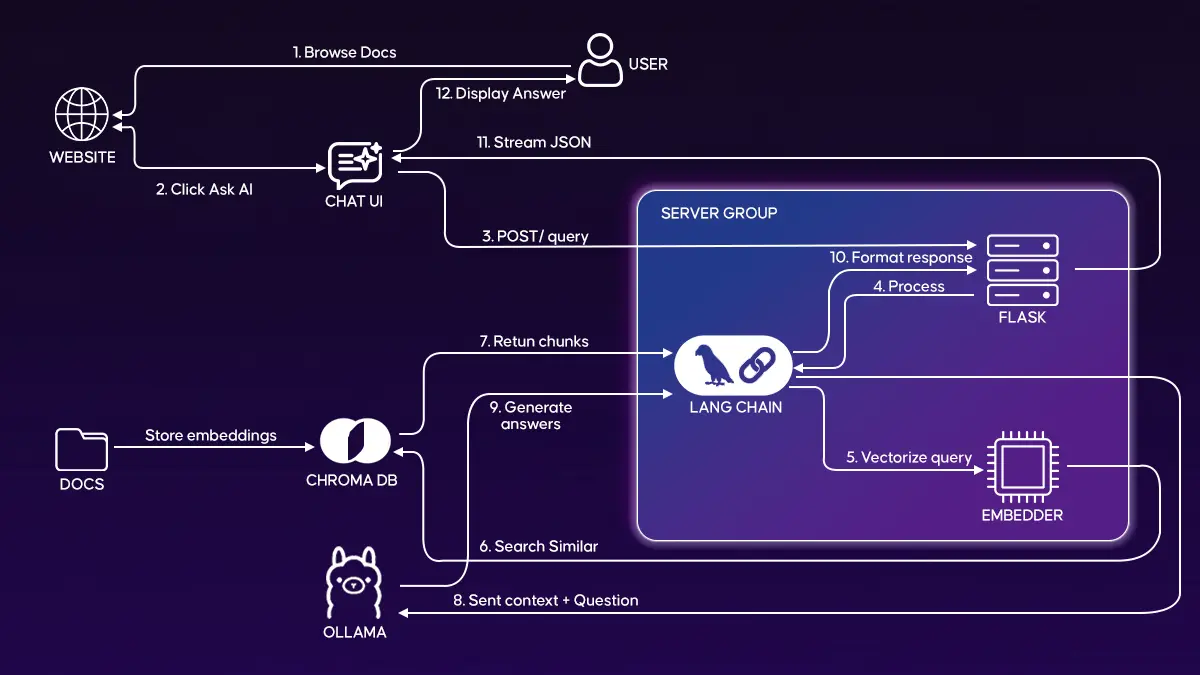
This architecture follows a simple request–retrieve–generate flow layered on top of an existing documentation site. The user starts inside the documentation UI, opens the chat widget, and submits a question. The widget sends the request to a lightweight backend API that orchestrates retrieval and response generation.
On the backend, the question is converted into an embedding and used to search the vector store for the most relevant documentation chunks. Those retrieved chunks are then injected into a grounded prompt and passed to the language model to generate an answer strictly based on the documentation context. The formatted response is streamed back to the chat widget and rendered in the UI with source visibility.
The design intentionally separates concerns across UI interaction, retrieval infrastructure, and model execution. This keeps the system easy to reason about, test independently, and evolve as documentation volume or usage grows.
From here, we’ll break down each core component and explain how they work together in more detail.
Understanding the Core Components
1. Document Ingestion: Converting Markdown Docs into Searchable Embeddings
What it does:
Converts Markdown files in ./docs/ into searchable vector embeddings.
from pathlib import Path

for file in Path("docs").glob("**/*.md"):
    chunks = split_text(file.read_text(), size=500)
    vectorstore.add_documents(chunks)
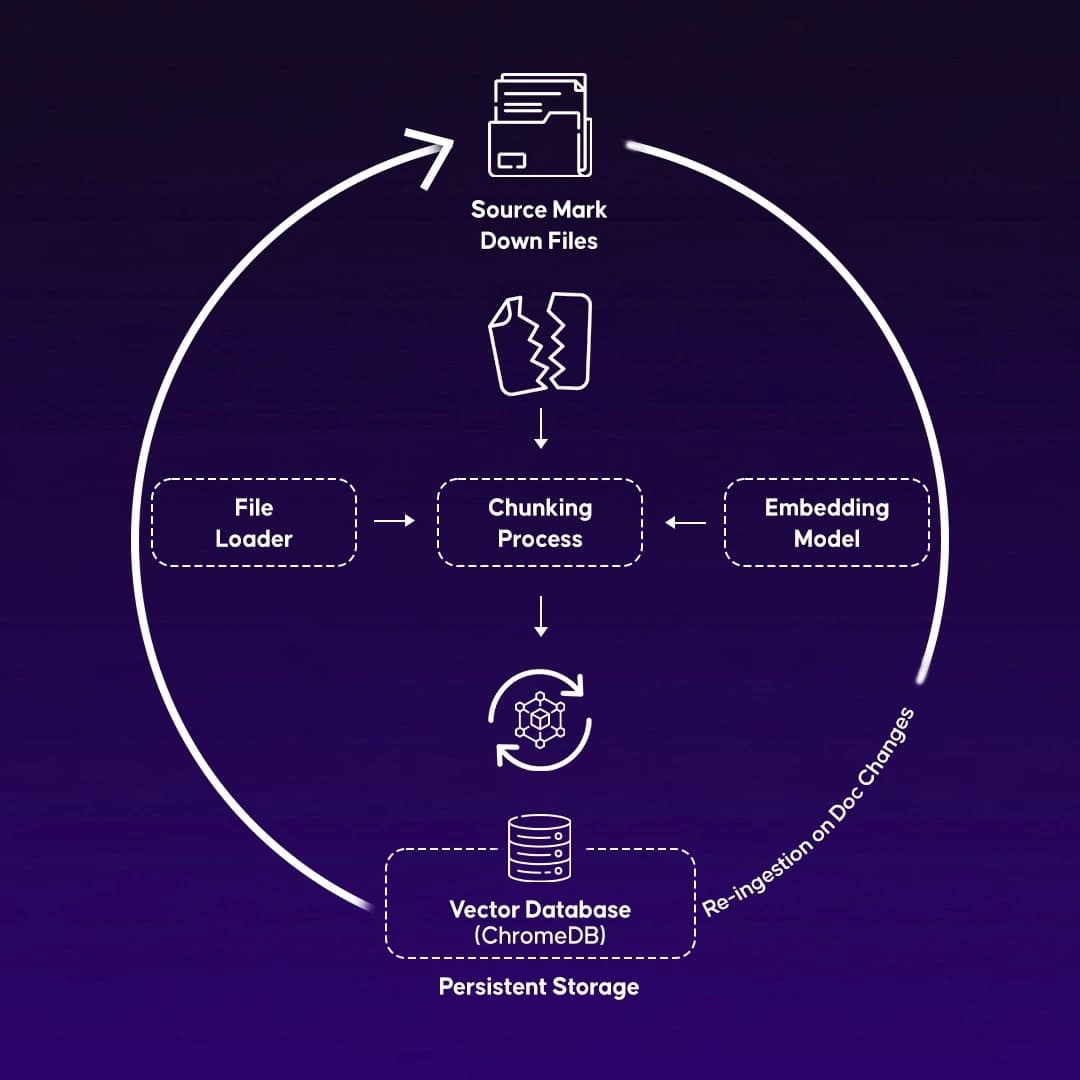
Each file is split into small chunks to improve retrieval accuracy.
The chunks are embedded and stored persistently in ChromaDB so ingestion only runs once unless docs change.
2. Frontend Chat Widget: Embedding AI Search Inside the Documentation UI
What it does:
Provides an embedded chat interface inside the documentation UI.
fetch("/api/query", {
    method: "POST",
    body: JSON.stringify({ question: "How do I deploy?" })
});
The widget exposes an Ask AI button that opens a floating chat panel.
Responses stream back incrementally, creating a real-time typing experience.
3. Backend Orchestration: Flask API for Retrieval and Prompt Grounding
What it does:
Coordinates retrieval, prompt construction, and response streaming.
docs = vectorstore.similarity_search(question, k=5)
prompt = build_prompt(docs, question)
return ollama.generate(prompt, stream=True)
The backend ensures that every response is grounded in retrieved documentation rather than general model knowledge.
4. Vector Storage: Semantic Search Using ChromaDB
What it does:
Performs fast semantic similarity search across documentation embeddings.
results = vectorstore.similarity_search(query, k=5)Instead of keyword matching, similarity search retrieves conceptually related sections from the docs using encodings stored in VectorDB
5. Embedding Layer: Encoding Documentation and Queries for Similarity Search
What it does:
Converts text into numerical vectors for semantic matching using Ollama's Embedding model.
vector = embed("How do I configure the backend?")Both documentation chunks and user questions use the same embedding space, enabling reliable similarity comparison.
6. Local Inference: Running the Language Model with Ollama
What it does:
Generates answers using retrieved context and streams output back to the UI.
ollama.chat(model="llama2", messages=[prompt], stream=True)Inference runs fully locally and produces incremental output for faster perceived latency.
Technical Implementation: Integrating Product Documentation with Ollama LLMs
Prerequisites
In the sections below, you’ll learn how to integrate an AI documentation assistant into a real product from scratch using Ollama as the model runtime. While this walkthrough uses llama3.2:1b for generation and all-minilm for embeddings, the same pipeline works with other Ollama models such as Mistral, LLaMA 3.1, Phi, or Code Llama depending on accuracy, latency, and memory constraints.
The implementation assumes a Mintlify-based documentation site (see our Mintlify vs GitBook comparison if you're still choosing a docs platform), but the ingestion and retrieval flow applies equally to any Markdown or MDX documentation stack. By the end of this section, you will understand how to connect your documentation, models, and retrieval layer into a functioning AI documentation assistant that can answer product questions using your own content.
To run the system, you’ll need:
- Python 3.9 or newer
- At least 8 GB RAM for model inference
- Git and a code editor such as VS Code
- ~10 GB free disk space for models and embeddings
Optional
Node.js if you plan to integrate the widget into a Mintlify documentation site
You can verify your environment quickly:
python --version
node --version
npm --version
Local Development Setup and Environment Configuration
This setup initializes the core components of the RAG pipeline: model runtime, backend services, and document indexing. Each step builds a required capability in the end-to-end flow.
1. Install Ollama and Pull the Models
Ollama provides the runtime used to execute language models inside the pipeline. The generation model produces answers, while the embedding model converts text into vectors for semantic retrieval.
Install Ollama:
curl -fsSL https://ollama.ai/install.sh | shPull the generation model used for response synthesis:
ollama pull llama3.2:1bPull the embedding model used for semantic search:
ollama pull all-minilmVerify that both models are available to the runtime:
ollama listAt this point, the system has everything required to generate embeddings and produce answers during query execution.
2. Clone the Repository and Install Backend Dependencies
The backend contains the ingestion pipeline, retrieval logic, and API endpoints that orchestrate the RAG flow.
Clone the repository and move into the backend directory:
git clone https://github.com/Infrasity-Labs/growth-marketing-playbooks.gitCreate an isolated Python environment and install dependencies:
python -m venv venv
source venv/bin/activate

# Windows:
venv\Scripts\activate

pip install flask langchain chromadb sentence-transformers
These python dependencies enable document loading, embedding generation, vector storage, and API routing.
3. Add Your Product Documentation Files
The documentation files placed in the docs/ directory become the knowledge base for retrieval. During ingestion, these files are parsed, chunked, embedded, and indexed.
ai-documentation-assistant/
├── backend/
│   └── app.py
├── docs/
│   ├── introduction.md
│   ├── quickstart.md
│   └── core-concepts.md
└── chat-widget.js
Any Markdown file added here will automatically participate in retrieval once ingestion is executed.
4. Start the Services
Two services need to run for the pipeline to function: the model runtime and the backend API.
# Start the model runtime:
ollama serve

# Start the backend API:
cd backend
python app.py
The backend exposes endpoints for ingestion and querying at:
http://localhost:5000Once both services are running, the system is ready to index documents and accept queries.
5. Ingest Documents and Validate the RAG Pipeline
Ingestion converts the documentation into embeddings and persists them in the vector store. This step only needs to be repeated when documentation changes.
# Trigger ingestion:
curl -X POST http://localhost:5000/ingest

# Validate that retrieval and generation are wired correctly by sending a test query:
curl -X POST http://localhost:5000/api/query \
  -H "Content-Type: application/json" \
  -d '{"question": "How do I start the project?"}'
At this point, the AI documentation assistant is fully wired end to end. The documentation has been indexed, embeddings are stored, retrieval is operational, and answers are being generated against real content. This confirms that the integration between the documentation layer, embedding pipeline, vector store, and Ollama models is functioning as a cohesive retrieval system rather than isolated components.
With the pipeline validated, we can now move into the backend implementation and examine how ingestion, retrieval orchestration, and response grounding are implemented in code.
Backend Implementation of the Retrieval and Generation Pipeline
So far, we’ve focused on getting the system wired end to end and validating that the AI documentation assistant can ingest documentation and answer real questions correctly. At this point, all the moving pieces are in place and behaving as expected.
Now we’ll move into the actual backend implementation and look at how the retrieval and generation pipeline is built in code. This includes how documentation is loaded and indexed, how embeddings are created and stored, how relevant context is retrieved at query time, and how the API exposes this capability to the frontend chat widget.
Instead of tightly coupling everything into a single request path, the application initializes the pipeline once at startup and reuses it for all incoming queries.
Let’s walk through the core pieces of backend implementation of AI Document Assistant:
1. Initializing the Generation and Embedding Models
The first step is initializing the generation model and the embedding model. Both are served through Ollama and shared across the application lifecycle.
The following code initializes the generation model and embedding model used by the RAG pipeline through the Ollama runtime.
llm = Ollama(
    model="llama3.2:1b",
    base_url="http://localhost:11434",
    temperature=0.7
)

embeddings = OllamaEmbeddings(
    model="all-minilm",
    base_url="http://localhost:11434"
)
The language model handles answer generation, while the embedding model converts both documents and queries into vector representations for similarity search.
This separation keeps retrieval and generation concerns independent and allows each layer to evolve without impacting the other.
2. Loading, Chunking, and Indexing Documentation
During startup, the application checks whether a vector database already exists. If it does not, the system builds one from the documentation files.
The following code loads all documentation files from the project directory so they can be indexed for retrieval.
loader = DirectoryLoader(
    docs_path,
    glob="**/*.mdx",
    loader_cls=TextLoader
)

documents = loader.load()
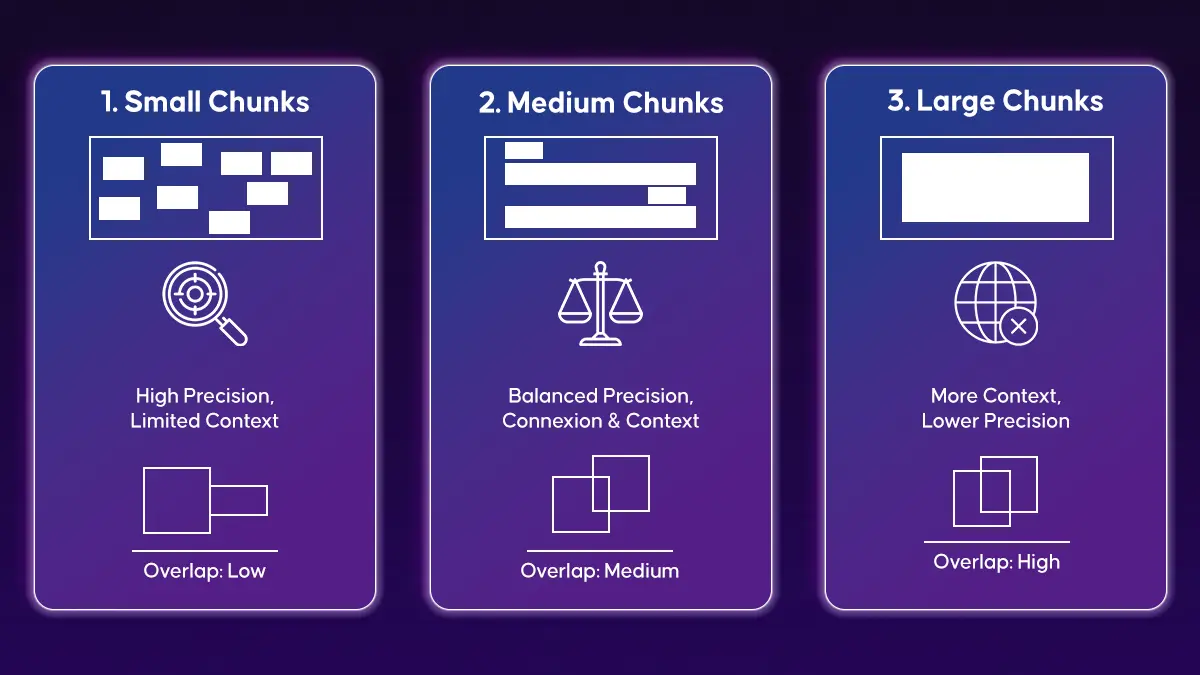
Documents are split into smaller chunks before embedding to improve retrieval accuracy and reduce context dilution.
The image below illustrates how chunk size and overlap affect retrieval behavior, showing the trade-off among precision, contextual coverage, and embedding efficiency when splitting documentation into vectorized segments.
The following code splits large documentation files into smaller chunks to improve retrieval accuracy and context quality.
text_splitter = RecursiveCharacterTextSplitter(
    chunk_size=500,
    chunk_overlap=50
)

chunks = text_splitter.split_documents(documents)
Each chunk is embedded and persisted into ChromaDB:
The following code converts document chunks into embeddings and persists them inside the vector database for fast semantic search.
vectorstore = Chroma.from_documents(
    documents=chunks,
    embedding=embeddings,
    persist_directory="./chroma_db"
)
This indexing step transforms static Markdown content into a searchable vector representation that can be queried efficiently at runtime.
3. Building the Retrieval and Prompt Grounding Pipeline
Once the vector store is ready, a retrieval chain is constructed to connect search results with generation.
The following code wires together retrieval, prompt grounding, and generation into a single query pipeline.
PROMPT = PromptTemplate(
    template=prompt_template,
    input_variables=["context", "question"]
)

qa = RetrievalQA.from_chain_type(
    llm=llm,
    retriever=vectorstore.as_retriever(search_kwargs={"k": 2}),
    return_source_documents=True,
    chain_type_kwargs={"prompt": PROMPT}
)
Key decisions here:
- Only the top 2 most relevant chunks are retrieved to keep prompts focused.
- A strict prompt instructs the model to answer only from the provided context.
- Source documents are returned for traceability and debugging.
This layer defines how retrieved knowledge flows into generation in a controlled way.
4. Query Execution Flow and API Endpoint
The /api/ask endpoint accepts a user question and routes it through the retrieval pipeline.
The following code accepts a user question, executes retrieval and generation, and formats the response for the frontend.
question = data.get("question", "").strip()
result = qa_chain({"query": question})

answer = result["result"]
sources = result["source_documents"]
The retrieval chain performs:
- Embedding the user query
- Searching the vector store
- Injecting retrieved chunks into the prompt
- Generating an answer using the language model
The backend then formats the response into a structured payload that includes both the answer and source references.
return jsonify({
    "answer": answer,
    "sources": formatted_sources,
    "question": question
})
This keeps the API contract simple and predictable for frontend consumption.
5. Health Checks and Runtime Validation
A small health endpoint exposes runtime status and model configuration.
The following code exposes a simple health endpoint to validate that models and services are running correctly.
@app.route("/api/health")
def health():
    return {
        "status": "ok",
        "models": {
            "llm": "llama3.2:1b",
            "embeddings": "all-minilm"
        }
    }
This endpoint is useful during deployment and debugging to confirm that the pipeline is running and models are correctly loaded. With the backend implementation complete, we can now move on to building the frontend experience for the AI documentation assistant in the next section.
Web Frontend Implementation of the Embedded Chat Widget
In this implementation, a Mintlify-based documentation site is used as the sample environment, so the frontend UI is launched using mintlify dev during development. This simply provides a convenient way to host and iterate on the documentation UI while integrating the chat experience.
In practice, the same AI documentation assistant frontend can be embedded into any documentation platform, including static sites, custom portals, or other documentation frameworks. The only requirement is the ability to include a JavaScript file and a small HTML container.
The chat interface itself is implemented in the chat-widget.js file, which is included in the GitHub repository. In the sections below, you’ll see how the widget initializes, connects to the backend API, and renders answers. Selected code snippets are included to clarify the interaction flow and UI behavior.
From a user perspective, the interaction is intentionally simple:
- Open the documentation page
- Click the Ask AI button
- Ask a question about the docs
- Receive an answer with visible source references
From an engineering perspective, the widget focuses on three responsibilities:
capturing user input, calling the backend API, and rendering responses safely.
1. Launching the Chat Experience
When the documentation page loads, a floating Ask AI button is visible. Clicking this button opens the chat panel and immediately focuses the input field so users can start typing without additional interaction.
This interaction establishes the entry point into the assistant and keeps the chat experience discoverable without cluttering the documentation layout.
The image below shows how the Ask AI button is embedded inside the documentation UI and how the chat panel opens alongside the documentation content.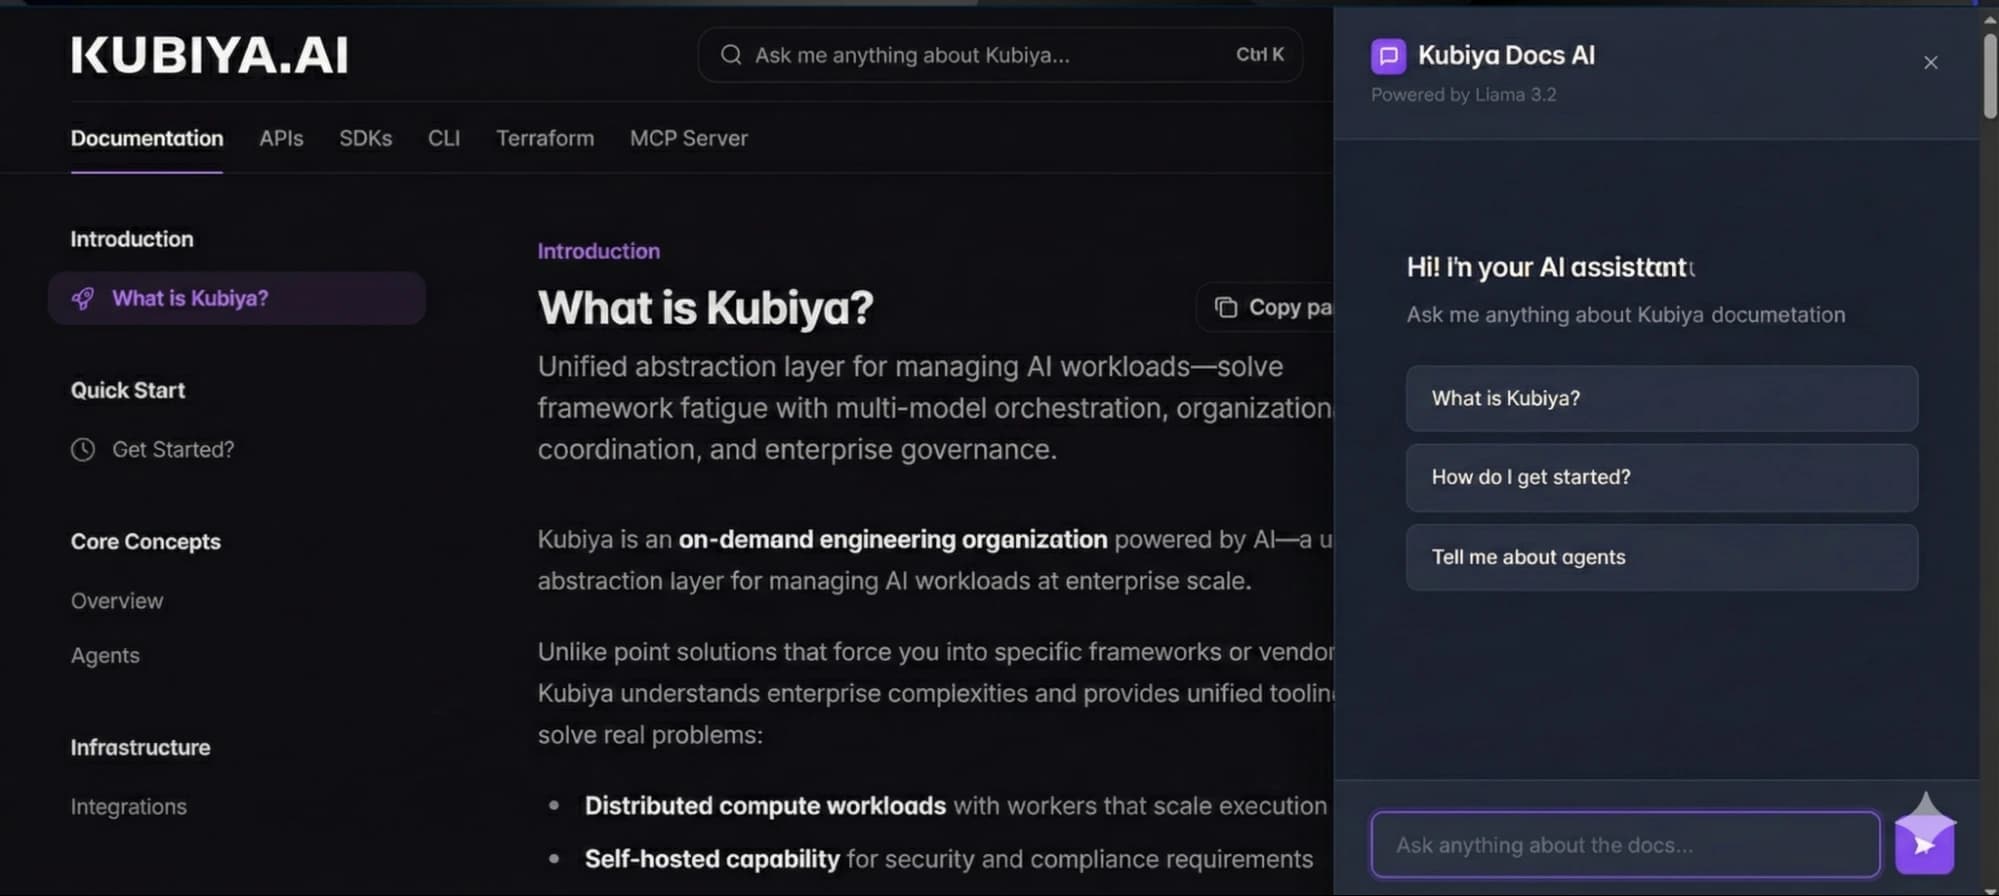
The following code shows how the chat panel visibility and input focus are toggled when the user opens or closes the widget.
function toggleChat(show) {
  this.chatContainer.style.display = show ? "block" : "none";
  this.askAiBtn.style.display = show ? "none" : "inline-block";
  if (show) this.chatInput.focus();
}
This keeps the UI behavior predictable and avoids complex state management.
2. Widget Initialization and DOM Wiring
The widget initializes once the page loads and captures references to the required DOM elements. This avoids repeated DOM lookups during interaction and keeps rendering fast and stable.
The following code shows how the widget stores references to all required DOM elements during construction.
class AIChatWidget { constructor() {   this.apiUrl = "http://localhost:5000/api/ask";   this.chatHistory = \[\];   this.askAiBtn = document.getElementById("ask-ai-btn");   this.chatContainer = document.getElementById("ai-chat-container");   this.chatMessages = document.getElementById("chat-messages");   this.chatInput = document.getElementById("chat-input");   this.sendBtn = document.getElementById("send-btn");   this.closeBtn = document.getElementById("close-chat");   this.typingIndicator = document.getElementById("typing-indicator");   this.init();
 }
}
Event handlers are registered during initialization to keep all UI behavior centralized.
The following code shows how click and keyboard events are wired to open the chat and send messages.
init() {
  this.askAiBtn.onclick = () => this.toggleChat(true);
  this.closeBtn.onclick = () => this.toggleChat(false);
  this.sendBtn.onclick = () => this.sendMessage();
  this.chatInput.onkeypress = (e) => {
    if (e.key === "Enter" && !e.shiftKey) {
      e.preventDefault();
      this.sendMessage();
    }
  };
}
This keeps the widget small, predictable, and easy to extend.
3. Sending Queries and Handling Responses
When a user submits a question, the widget immediately renders the user message and sends the request to the backend API. While the request is in flight, the typing indicator is displayed and input is temporarily disabled to avoid duplicate submissions.
The following code shows how the frontend sends a question and recent chat history to the backend API.
const response = await fetch(this.apiUrl, {
  method: "POST",
  headers: { "Content-Type": "application/json" },
  body: JSON.stringify({
    question: question,
    chat_history: this.chatHistory.slice(-6)
  })
});
Only the recent conversation history is sent to keep payloads bounded and maintain conversational continuity.
Once the backend responds, the widget extracts the generated answer and source references and updates the UI. The following code shows how the frontend processes the backend response and stores it in the chat history.
const data = await response.json();
this.chatHistory.push({ role: "user", content: question });
this.chatHistory.push({ role: "assistant", content: data.answer });

this.addMessage("assistant", data.answer, data.sources);
The image below shows a completed interaction where the assistant returns an answer along with the source files that were used during retrieval.
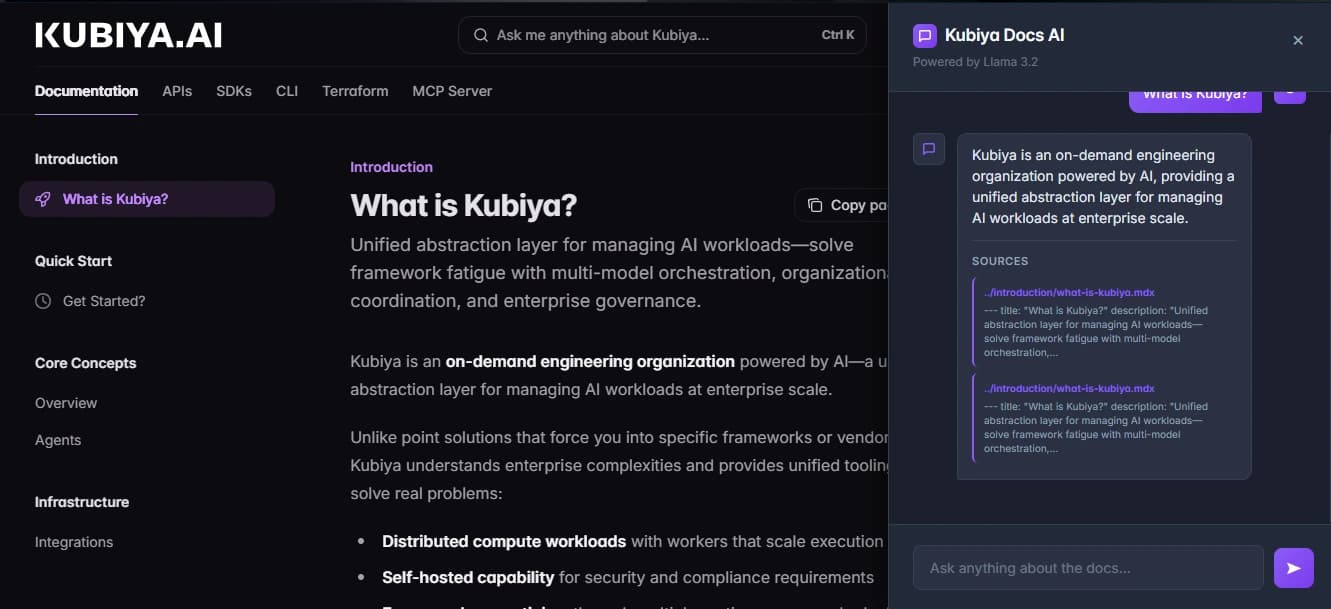
This feedback loop makes it clear to users where the answer originated and increases trust in the system.
4. Rendering Messages and Source Attribution
Message rendering is handled through a single function that safely builds the UI for both user messages and assistant responses.
The following code shows how messages and optional source references are rendered safely into the chat container.
addMessage(role, content, sources = \[\]) {
 const messageDiv = document.createElement("div");
 messageDiv.className = \`message ${role}\`; if (role === "user") {
   messageDiv.innerHTML = \`
     <div class="user-bubble"\>       ${this.escapeHtml(content)}
     </div>
   \`;
 } else {
   messageDiv.innerHTML = \`
     <div class="assistant-bubble"\>
       <div>${this.escapeHtml(content)}</div>       ${
         sources.length
           ? \`<div class="sources"\>                ${sources.map(s => s.file).join(", ")}
              </div>\`
           : ""       }
     </div>
   \`;
 }

 this.chatMessages.appendChild(messageDiv);
}
Important behaviors:
- User messages and assistant messages are visually distinct.
- Source files are shown when available.
- All content is escaped to prevent injection issues.
- Auto scrolling keeps the latest message visible.
This keeps the chat UI readable while preserving traceability.
5. Embedding the Widget into Any Page
The below code-block shows that widget does not depend on any framework and can be embedded into any page by including the required HTML container and script reference.
<button id="ask-ai-btn">Ask AI</button>

<div id="ai-chat-container" style="display:none;">
  <div id="chat-messages"></div>
  <input id="chat-input" />
  <button id="send-btn">Send</button>
  <button id="close-chat">×</button>
  <div id="typing-indicator">Typing...</div>
</div>

<script src="chat-widget.js"></script>
This allows the assistant to be dropped into existing documentation sites without modifying the build pipeline or introducing runtime dependencies.
Testing the Integration of the AI Documentation Assistant
At this stage, the AI documentation assistant has been integrated into the documentation UI and is ready to be validated as a complete system.
First, start the backend service:
python app.pyThis brings up the retrieval and generation pipeline and exposes the API endpoints consumed by the chat widget.
Next, start the documentation frontend. In this implementation, the UI is served using Mintlify:
mintlify devOnce the frontend is running, open your browser and navigate to:
http://localhost:3000You should see the documentation site with the Ask AI button available on the page. Open the chat panel and ask a few questions based on your documentation content. Verify that the assistant returns answers along with relevant source references.
This confirms that the backend pipeline, frontend integration, and user interaction flow are working together correctly as a single AI documentation assistant experience.
Conclusion
In this guide, you built a complete Retrieval Augmented Generation system that turns existing documentation into an interactive knowledge interface. You learned how to ingest structured content, generate embeddings, perform semantic retrieval, ground prompts reliably, and expose the pipeline through a production-ready API and frontend widget.
More importantly, you now have a working reference architecture for applying RAG to real documentation workflows, not just isolated demos. The same pattern can be extended to larger documentation sets, internal knowledge bases, or developer tooling where accuracy and traceability matter.
If you’d like to explore the implementation in detail, the full source code is available here:
Use it as a foundation to experiment, customize, and evolve your own documentation intelligence systems.
Frequently Asked Questions
1. What is an AI documentation assistant and how does it work?
An AI documentation assistant is a system that allows users to query product documentation using natural language instead of navigating pages or keyword search.
In this implementation:
- Documentation files are ingested and split into chunks
- Each chunk is converted into vector embeddings
- User questions are embedded and matched using similarity search
- Relevant chunks are injected into a prompt
- A language model generates a grounded answer
This keeps responses aligned with real documentation content rather than generic model knowledge.
2. Why is a retrieval-based approach important for an AI documentation assistant?
A retrieval-based architecture ensures that answers are generated from authoritative documentation instead of model memory.
Key benefits include:
- Documentation updates are reflected immediately after re-ingestion
- Reduced hallucination risk
- Clear traceability between answers and source content
- No model retraining required when docs change
This makes the system reliable for engineering and support workflows.
3. What types of documentation work best for an AI documentation assistant?
An AI documentation assistant performs best when documentation is:
- Written in Markdown or MDX
- Structured with clear headings and sections
- Split into smaller topic-focused files
- Updated regularly as product behavior changes
API references, setup guides, configuration docs, and troubleshooting content are particularly well suited for retrieval-based systems.
4. Can this AI documentation assistant be integrated into any documentation platform?
Yes. The assistant frontend is implemented as a lightweight JavaScript widget and can be embedded into most documentation platforms.
Common integration targets include:
- Mintlify documentation sites
- Static HTML documentation portals
- Custom internal documentation tools
- Developer portals and product dashboards
As long as the platform allows including JavaScript and HTML, the assistant can be integrated without major changes.
5. How can this AI documentation assistant be extended for production use?
Once the core pipeline is stable, the assistant can be extended with:
- Source deep linking into documentation pages
- Usage analytics and query tracking
- Role-based access for internal documentation
- Caching and performance optimization
- Observability around latency and failure rates
These extensions build on the same retrieval and orchestration foundation.